Banana Pudding
Savor the World.
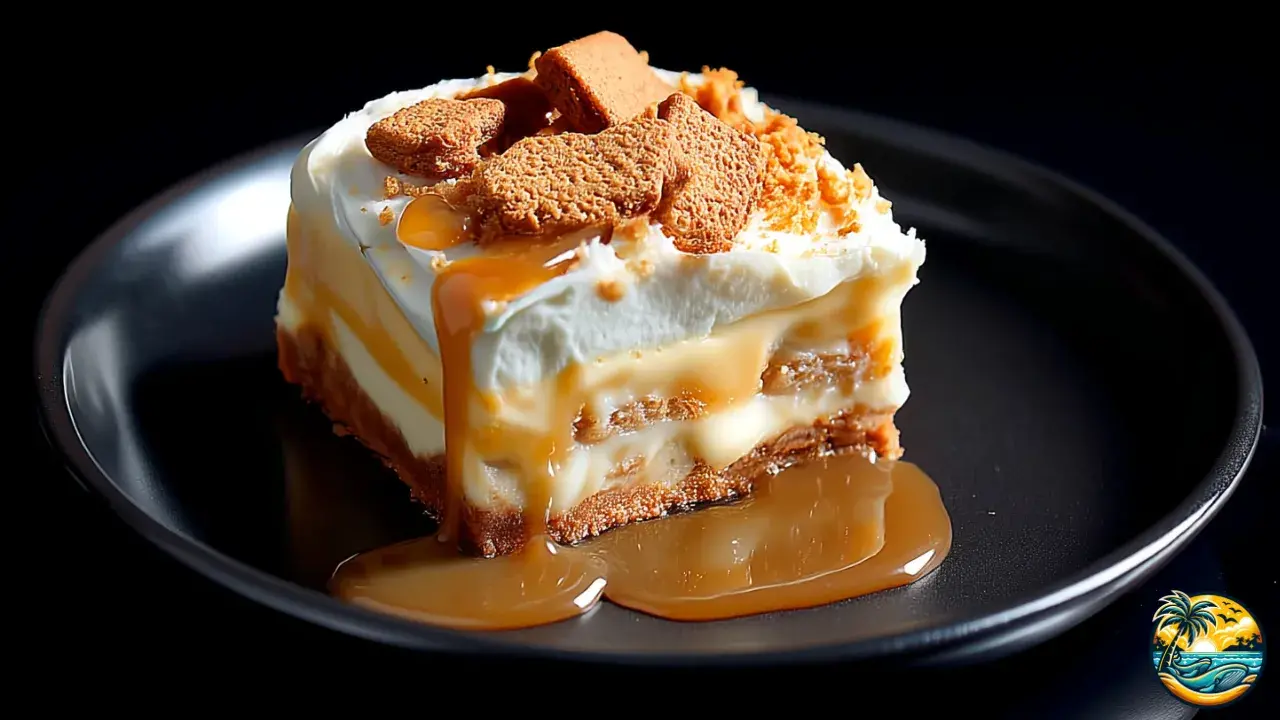
Banana Pudding
I love bananas and I love pudding, so this easy, creamy dessert that makes you smile from the very first bite is exactly what we all need. This classic Southern recipe layers ripe bananas, cookies, and vanilla pudding to create a treat that’s just as beautiful as it is delicious. It’s perfect for gatherings and celebrations—or simply for treating yourself to something sweet and comforting without making a mess in the kitchen. Sounds pretty great, right?

Banana Pudding
Servings: 6
Prep Time: 10 minutes
Cook Time: 20 minutes
Total Time: 30 minutes
Ingredients:
- 2 ripe bananas, sliced
- 2 cups (480 ml) whole milk
- 1 can (14 oz / 396 g) sweetened condensed milk
- 1 box (3.4 oz / 96 g) instant vanilla pudding mix
- 1 cup (240 ml) heavy cream
- 1 teaspoon (5 ml) vanilla extract
- 24 vanilla wafer cookies
- Pinch of salt
What You’ll Need:
- Electric or hand mixer
- Silicone spatula
- Large mixing bowl
- Glass dish or individual serving cups
- Knife for slicing bananas
See 5 variations of the recipe at the end.

You might also be interested in:
Did You Know?
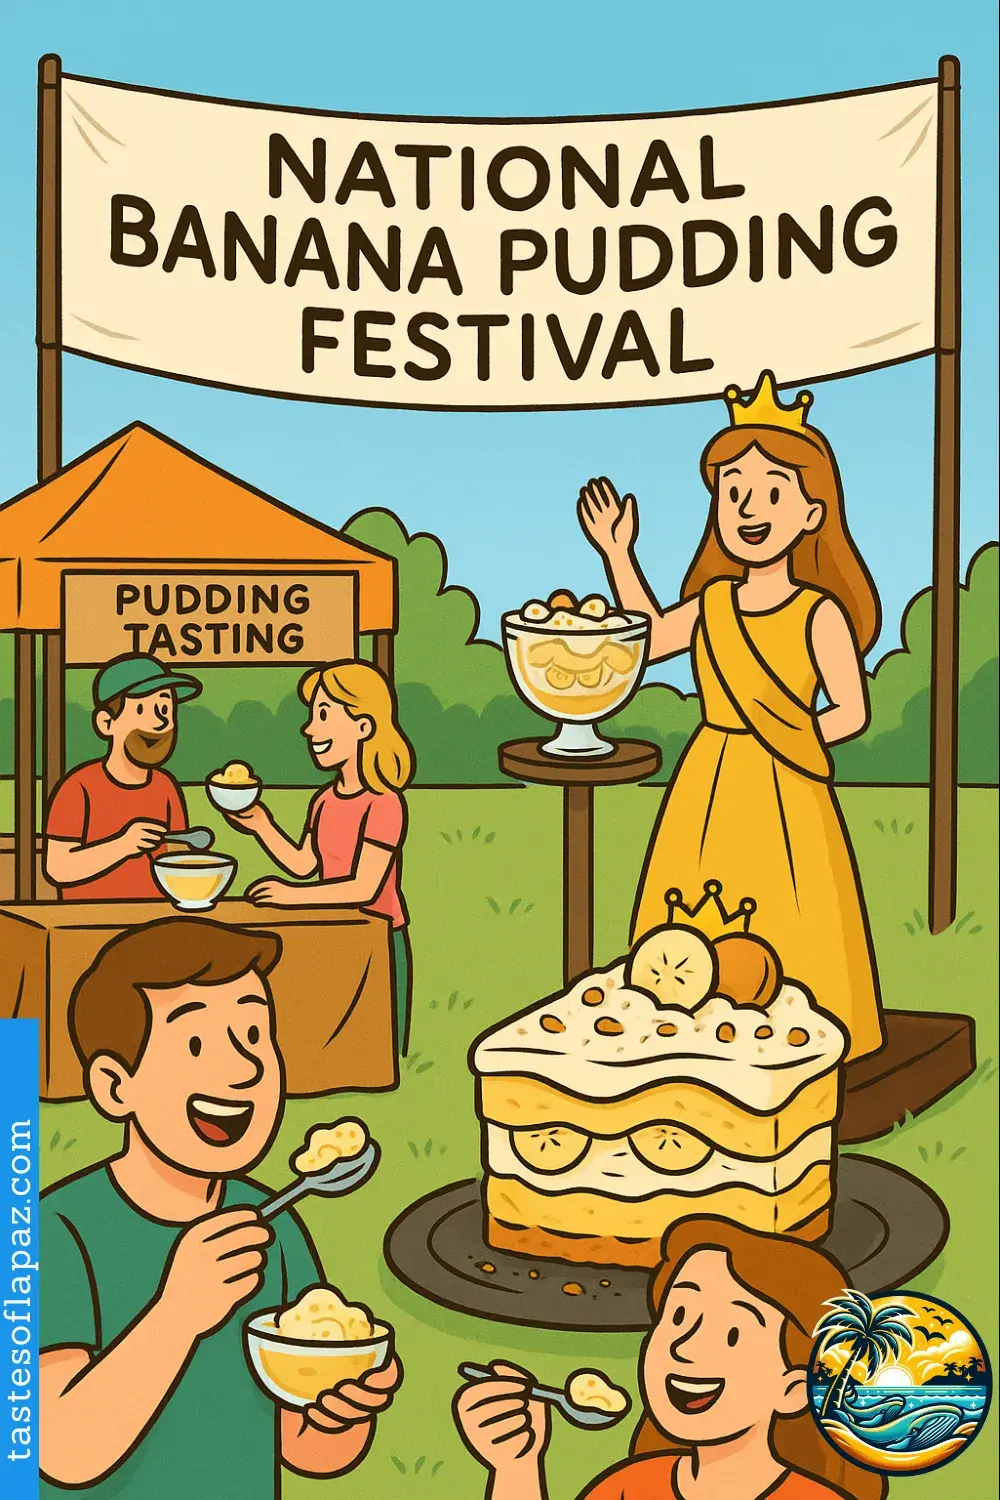
Banana pudding is so beloved in the Southern U.S. that there’s an actual festival in its honor! Every year in Centerville, Tennessee, the “National Banana Pudding Festival” brings together pudding lovers for tastings, contests, and even a pudding queen. Now that’s what we call dessert pride!
Instructions:
- Mix the pudding: Let’s get started! In a large bowl, pour in the cold whole milk, add the vanilla pudding mix and the can of sweetened condensed milk. Then, using a whisk or electric mixer on medium speed, mix for 2 to 3 minutes until everything is well combined and the mixture starts to thicken. You’re looking for a creamy texture—not too runny, but not overly thick either.
- Make the whipped cream: Next, using a clean, chilled bowl (you can pop it in the freezer for a few minutes), pour in the heavy cream and add the vanilla extract along with a pinch of salt. Beat on medium-high speed until soft peaks form—meaning the cream holds its shape but the tips gently fold over. Just don’t overmix it.
- Fold in the cream: Once your whipped cream is ready, gently fold it into the pudding mixture using a silicone spatula. Make slow, sweeping motions from the bottom to the top, rotating the bowl as you go. This keeps it fluffy and light—don’t stir aggressively!
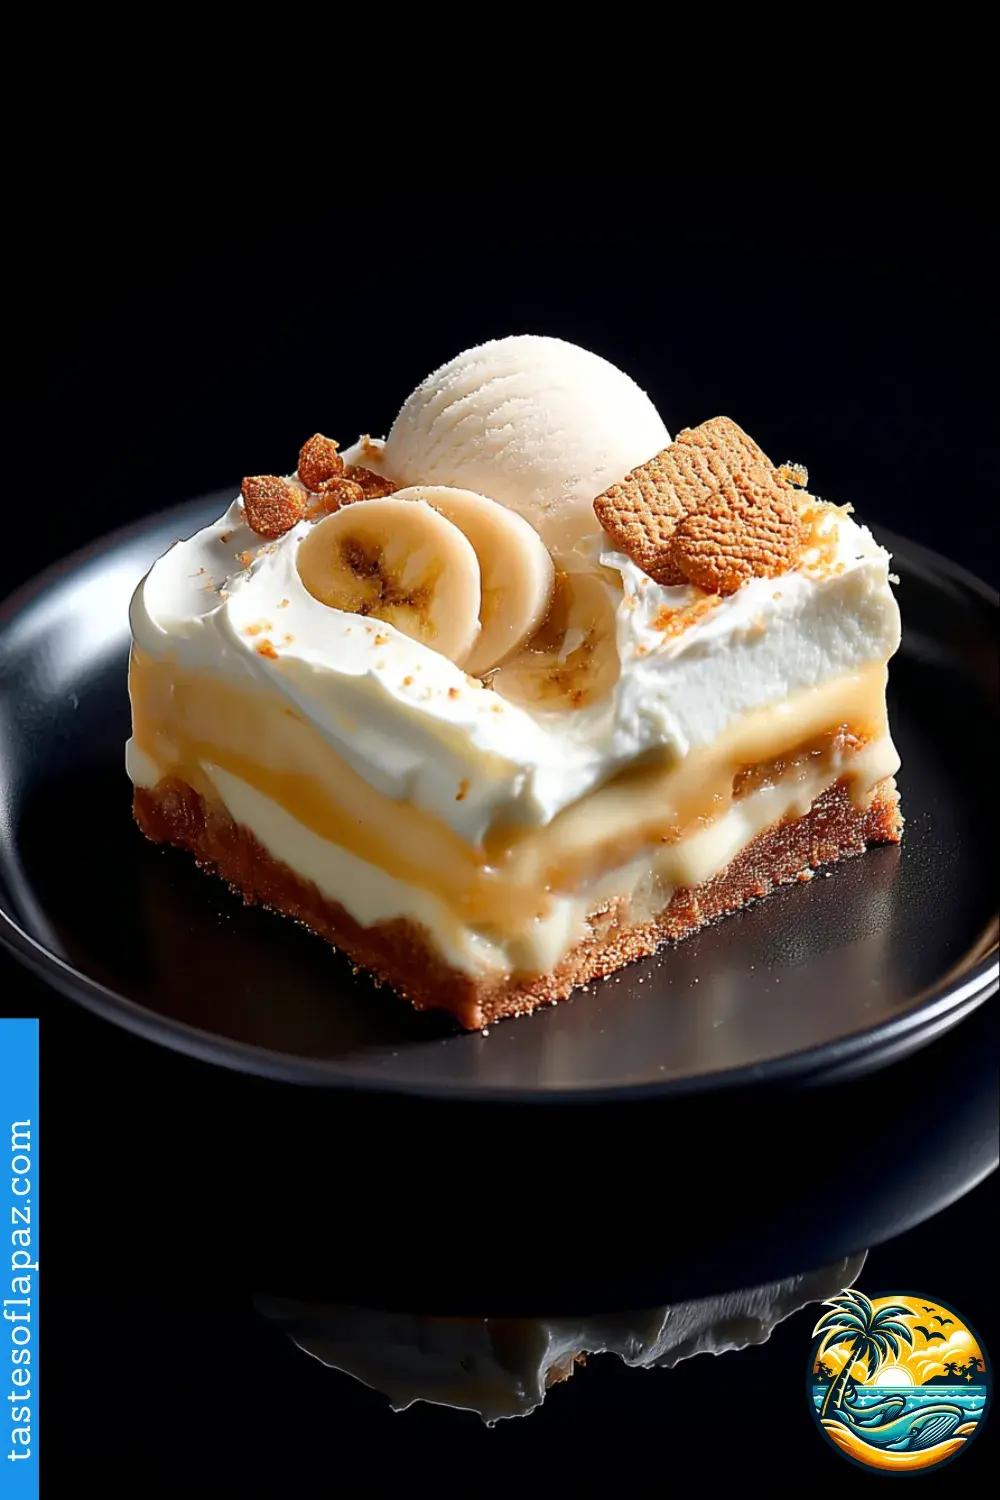
- Build the layers: Now comes the fun part. Start by placing a layer of vanilla wafers at the bottom of your glass dish. On top, lay down an even layer of banana slices to cover the cookies. Then, spoon over a layer of the pudding and whipped cream mixture, smoothing it out with your spatula.
- Repeat and decorate: Keep layering—cookies, bananas, pudding—until your dish is full, finishing with a layer of the creamy pudding on top. Decorate with some crushed wafers and a few fresh banana slices right before serving to keep things fresh and pretty.
- Chill it: That’s it! Just cover your dish with plastic wrap and refrigerate for at least 2 hours. This lets the cookies soften and the flavors come together. If you have time, let it sit overnight—it gets even better.

Ingredient Substitutions
- Milk: If you don’t have it, you can use almond or oat milk instead of whole milk for a dairy-free version.
- Pudding: If you can’t find instant pudding mix, make your own using cornstarch, sugar, milk, and a bit of vanilla.
- Cookies: You can swap vanilla wafers for Maria cookies, shortbread, or thin slices of sponge cake.
- Whipping cream: If you’re out of it, plain Greek yogurt makes a lighter, creamy alternative.
- Flavor extracts: You can switch the vanilla extract for coconut or almond to mix up the flavor.

Prep Tips
- Fresh bananas: While they should be ripe, slice them right before using to prevent oxidation and browning.
- Individual presentation: For a more elegant and practical serving style, layer everything into clear glasses.
- Perfectly whipped cream: Be gentle—don’t overwhip. Soft and airy is all you need.
- Refrigeration: Always chill the dessert for at least 2 hours. Even better? Let it rest overnight so the flavors come together beautifully.
- Banana placement: Be sure to tuck banana slices between layers to avoid exposure to air and keep them looking fresh.

Nutritional Information (per serving):
- Energy: 320 kcal
- Protein: 6 g
- Healthy fats: 12 g
- Carbohydrates: 48 g
- Natural sugars: 18 g
- Fiber: 2 g
- Sodium: 220 mg

Nutritional Benefits:
Banana pudding offers a delicious blend of ingredients that provide energy and real satisfaction. Bananas, as you probably know, are rich in potassium, vitamin B6, and fiber, which support digestion and heart health. The milk and cream contribute calcium for strong bones and protein to help maintain muscle. Sure, it’s a dessert—but when enjoyed in moderation, it’s a comforting and balanced treat that’s perfect for sharing with loved ones or indulging your sweet side once in a while.
Storing & Reheating
- Storage: Store your banana pudding in an airtight container or tightly cover with plastic wrap.
- Refrigeration: You can keep it in the fridge for 3 to 4 days, no problem. Just know that the cookies will continue to soften over time.
- Don’t freeze it: Freezing is not a good idea—bananas get mushy and dark once thawed.
- No reheating needed: This dessert is meant to be enjoyed cold, straight from the fridge—no warming required.

Recipe History & Inspiration
Banana pudding is a true Southern classic in the U.S., especially beloved at family gatherings, BBQs, and celebrations. Its roots go back to the late 1800s, when bananas became widely available in the South. Since then, it’s become a comforting, nostalgic treat—passed down from generation to generation with countless sweet variations.

Serving Suggestions
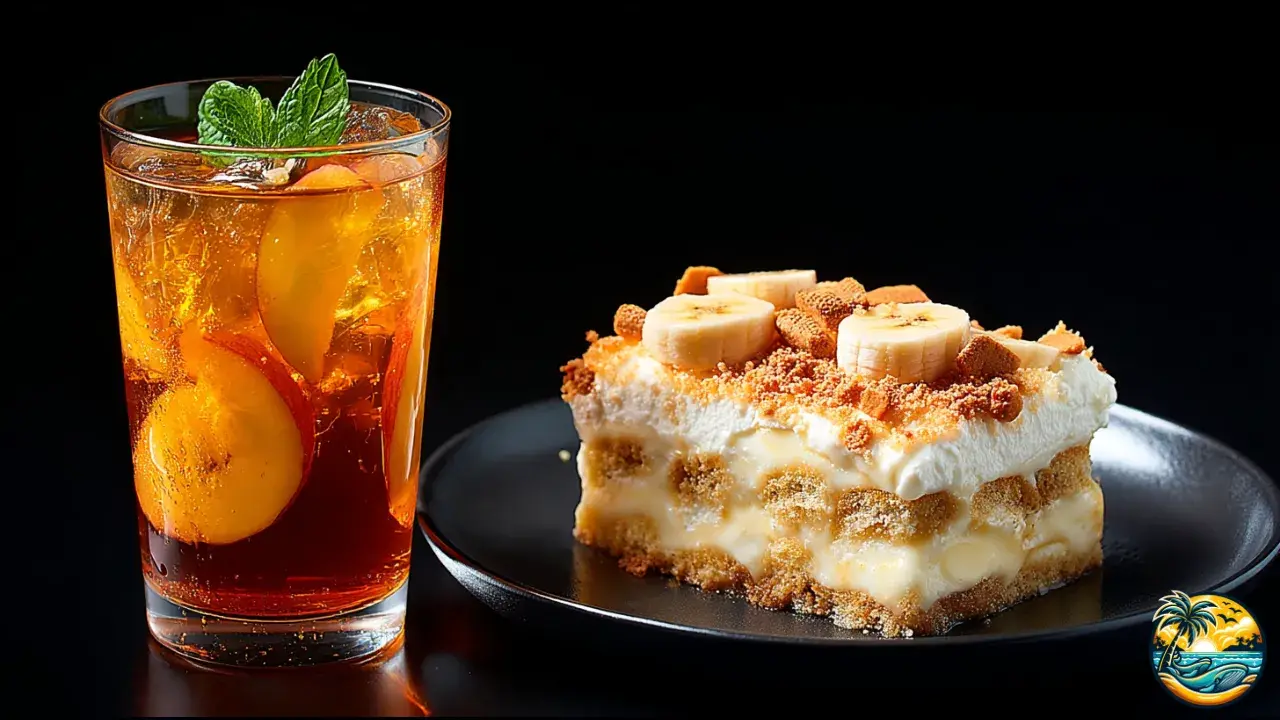
- Try it with a glass of peach iced tea or minty lemonade—so refreshing!
- Mini fruit tarts make a fun and colorful side to add texture contrast.
- Top your banana pudding with a handful of caramelized nuts for extra crunch.
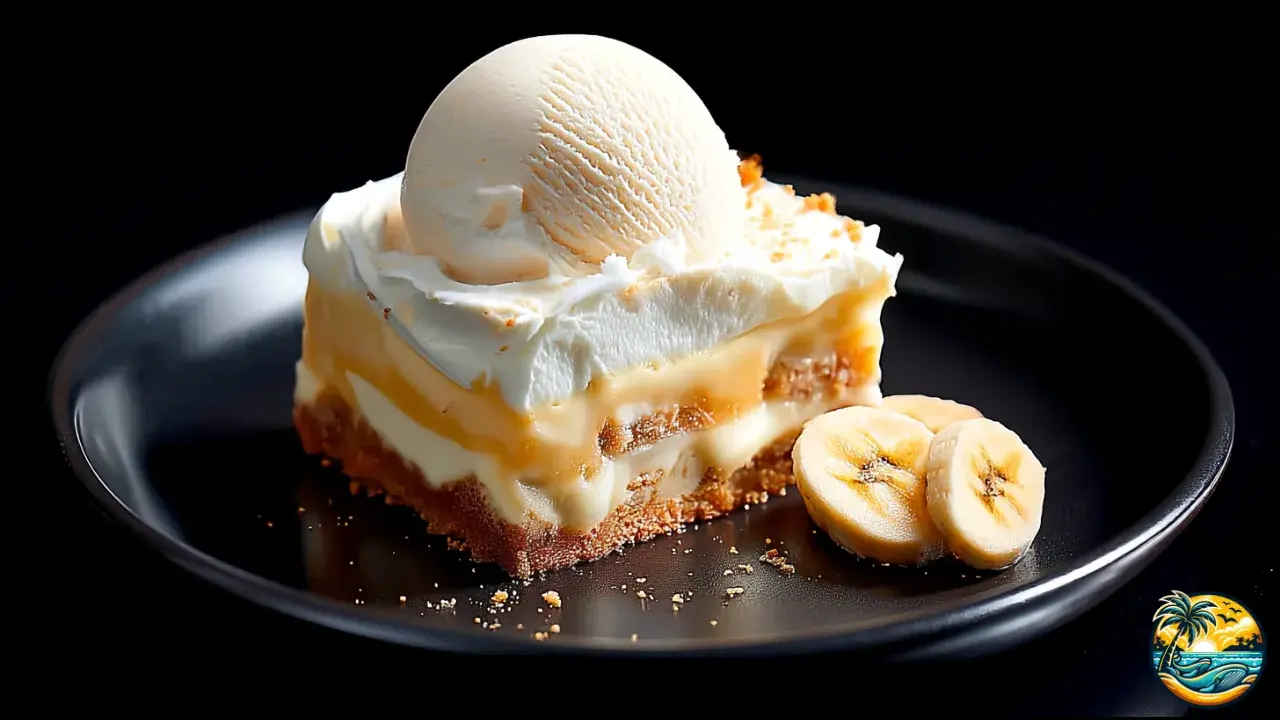
- Pair it with a scoop of vanilla ice cream for an extra decadent treat.
- Drizzle a little caramel sauce on top to deepen the flavor.

Frequently Asked Questions (FAQ)
- Can I make it dairy-free? Absolutely! Use plant-based milk, coconut cream, and a non-dairy pudding mix.
- Can I make it a day ahead? Yes! In fact, it tastes even better after resting overnight in the fridge.
- What if my bananas turn black? Add them just before serving or sprinkle a few drops of lemon juice to slow down the browning.
- Can I use another fruit? You can—but it won’t be banana pudding anymore! Strawberries or peaches work nicely as alternatives.
- What texture should the cookies have? They start out crisp, but after resting, they soften into a cake-like texture—just the way it should be.

Recipe Variations
- Chocolate Banana Pudding: Oh yes—just add chocolate chips between layers or swap vanilla pudding for chocolate.
- Coconut Banana Pudding: For the coconut lovers out there, use coconut milk and sprinkle toasted shredded coconut on top.
- Protein-Packed Version: Great for active folks—mix the pudding with Greek yogurt and vanilla protein powder.
- Vegan Banana Pudding: Use a plant-based pudding mix, non-dairy milk, and whipped coconut cream.
- Trifle Style: Want something more filling? Add layers of vanilla cake or sponge to give it a trifle twist.


So, this Southern treat isn’t just incredibly tasty — it’s also surprisingly easy to make, as you’ve probably noticed. Don’t miss the chance to try this delicious, simple dessert that’s full of homemade love. Make it for a special gathering, your family, or just to treat yourself — either way, you’ll impress anyone who takes a bite. Happy cooking!
Tastes of La Paz.
Banana Pudding
Servings: 6
Prep Time: 10 minutes
Cook Time: 20 minutes
Total Time: 30 minutes
Ingredients:
- 2 ripe bananas, sliced
- 2 cups (480 ml) whole milk
- 1 can (14 oz / 396 g) sweetened condensed milk
- 1 box (3.4 oz / 96 g) instant vanilla pudding mix
- 1 cup (240 ml) heavy cream
- 1 teaspoon (5 ml) vanilla extract
- 24 vanilla wafer cookies
- Pinch of salt
Equipment:
- Electric or hand mixer
- Silicone spatula
- Large mixing bowl
- Glass dish or individual serving cups
- Knife for slicing bananas
Instructions:
- Mix the pudding: Let’s get started! In a large bowl, pour in the cold whole milk, add the vanilla pudding mix and the can of sweetened condensed milk. Then, using a whisk or electric mixer on medium speed, mix for 2 to 3 minutes until everything is well combined and the mixture starts to thicken. You’re looking for a creamy texture—not too runny, but not overly thick either.
- Make the whipped cream: Next, using a clean, chilled bowl (you can pop it in the freezer for a few minutes), pour in the heavy cream and add the vanilla extract along with a pinch of salt. Beat on medium-high speed until soft peaks form—meaning the cream holds its shape but the tips gently fold over. Just don’t overmix it.
- Fold in the cream: Once your whipped cream is ready, gently fold it into the pudding mixture using a silicone spatula. Make slow, sweeping motions from the bottom to the top, rotating the bowl as you go. This keeps it fluffy and light—don’t stir aggressively!
- Build the layers: Now comes the fun part. Start by placing a layer of vanilla wafers at the bottom of your glass dish. On top, lay down an even layer of banana slices to cover the cookies. Then, spoon over a layer of the pudding and whipped cream mixture, smoothing it out with your spatula.
- Repeat and decorate: Keep layering—cookies, bananas, pudding—until your dish is full, finishing with a layer of the creamy pudding on top. Decorate with some crushed wafers and a few fresh banana slices right before serving to keep things fresh and pretty.
- Chill it: That’s it! Just cover your dish with plastic wrap and refrigerate for at least 2 hours. This lets the cookies soften and the flavors come together. If you have time, let it sit overnight—it gets even better.
Nutritional Information (per serving):
- Energy: 320 kcal
- Protein: 6 g
- Healthy fats: 12 g
- Carbohydrates: 48 g
- Natural sugars: 18 g
- Fiber: 2 g
- Sodium: 220 mg

Tastes of La Paz.